

A microphone arm fits only when the complete mounted weight, thread connection, desk clamp and movement path all work together. Check those four things before ordering. A matching screw thread alone does not tell you whether the arm will hold its position or clear your monitor.
Check your setup before buying
You need a scale, a ruler or tape measure, and the manuals for the microphone and arm. Keep the exact model names beside you: PSA1 and PSA1+, for example, have different load ranges.
- Weigh the parts that will actually hang from the arm: microphone, clip or shock mount, adapter and any attached pop filter. Leave the removable desk base out of that total. Compare the result with both ends of the arm’s stated load range.
- Identify the thread at the arm tip and the socket in the microphone’s mounting bracket. Check the required adapter and its direction in the manuals. A USB or XLR connector does not identify the mounting thread.
- Measure the desk thickness at the intended clamp location. Look underneath: check the flat contact area, available depth and any frame, drawer or cable tray. Confirm the desk material and edge shape are suitable for that clamp.
- Mark where the microphone should sit while you are seated normally. Measure from the proposed mounting point, then check the arm’s movement path around the monitor, keyboard and wall. Leave cable slack at moving joints.
Why a light microphone can be the wrong match
An arm’s maximum load is only half the weight check. RØDE specifies 700–1,100 g for the PSA1, including the microphone and shock mount or clip. A lighter assembly is outside that published range even though it is comfortably below the maximum. The PSA1+ data sheet instead lists 94–1,200 g; the plus sign matters.
Example: a 150 g microphone plus a 120 g mount weighs 270 g before other attached accessories. That is below the PSA1’s stated minimum.
The original Elgato Wave Mic Arm lists 250–1,000 g including accessories. Do not confuse it with Wave Mic Arm MK.2 or LP. On the Wave Mic Arm LP page, Elgato gives a 2 kg maximum including accessories but no numerical minimum; that omission is not a universal lightweight-microphone guarantee.
Check the adapter, not just the microphone name
Common mounts use different thread sizes. For one concrete example, Elgato’s Wave Mic Arm LP specifications list 1/4" to 3/8" and 1/4" to 5/8" adapters. Match both ends of the required connection, including whether each end is a socket or screw. An adapter changes that connection; it does not increase the arm’s load rating.
Try the correct parts together by hand before hanging the microphone. If the thread will not start smoothly, stop and check the instructions rather than forcing it. Also check that the microphone bracket can tilt without the connector hitting the arm.
Measure under the desk as well as on top
A clamp opening is not a complete desk-fit check. FIFINE’s BM66 support page specifies a 20–60 mm desktop, at least 53 mm of clamping depth and a 90-degree edge. A 30 mm thick desk can meet the thickness requirement and still fail if a frame leaves only 35 mm of usable depth.
Check the desk maker’s mounting guidance, especially for glass, hollow construction or a bevelled edge. Do not treat a reinforcement plate as automatic approval for an unsuitable desktop. If the required flat contact area is missing, choose an approved alternative mount or a suitable freestanding stand.
Low profile still needs clearance
For the Wave Mic Arm LP, the manufacturer’s dimension drawings distinguish 70 mm underneath the lower arm from 101 mm to its top. A monitor with an 80 mm gap cannot clear that 101 mm section simply because the listing says 70 mm clearance. Check the illustrated measurement endpoints, not just the headline number.
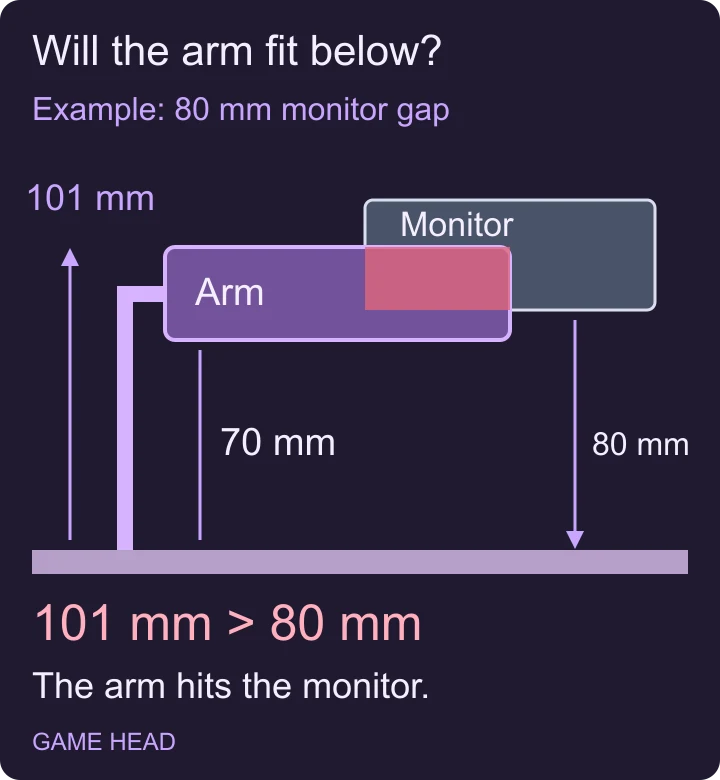
Measure the monitor’s actual lower edge, including its stand, then trace the intended path with the microphone and plug dimensions in mind. Check both your speaking position and where you will park the arm. USB and XLR cables both need room to move without pulling on the microphone.
If the arm will not stay where you put it
| Symptom | First check |
|---|---|
| Arm rises on its own | Recheck the minimum supported weight and the adjustment procedure for that exact model. |
| Arm sags | Support the microphone; check total attached weight and the prescribed joint adjustment. Do not exceed the rated maximum. |
| Clamp slips or twists | Stop using it until contact area, desk suitability and mounting instructions have been checked. |
| Mic fits, but the plug hits the arm | Check bracket rotation, connector clearance and any manufacturer-approved extension. |
Once the physical setup works, continue with microphone positioning and OBS settings. Still deciding on the connection? Our USB versus XLR guide covers that separate choice.
Frequently asked questions
Do all microphones fit all boom arms?
No. Check the complete mounted weight, mounting thread and adapter, desk clamp and movement clearance. A matching thread settles only one part of compatibility.
Does a USB microphone need a special arm?
The USB connector does not determine the arm. Check the microphone’s mounting bracket and thread, the complete attached weight and space for its cable plug.
Why does my arm spring back up?
A microphone assembly below the arm’s minimum load can be one cause. Check the exact model’s load range and adjustment instructions before changing screws; do not add improvised weights.