
To record game audio, your microphone and Discord separately in OBS, capture them as separate sources and assign each to its own recording track. Keep an additional mixed track for convenient playback. You can then lower a spoken comment in the edit without turning down the game at the same time.
This guide uses the Discord desktop app on Windows. Native application audio capture is available from OBS 28 on Windows 10 version 2004 or later and Windows 11. If you still need your first scene, start with our OBS setup guide for Twitch.
1. Capture the game, Discord and microphone separately
Launch the game and Discord. Under Sources → + → Application Audio Capture (BETA), add a source called “Game audio” and select the game window. Repeat for Discord. You should now have separate mixer controls. The OBS application audio guide illustrates the window selection.
From OBS 30.1, a Game Capture or Window Capture source can alternatively include the application’s sound through Capture Audio (BETA). Choose one capture route for the game so that you do not record it twice.
Disable Desktop Audio in Settings → Audio when capturing applications individually. Select your microphone once: either as a global Mic/Aux device there or as an Audio Input Capture source in the scene. Our Twitch microphone setup guide covers device selection and levels.
2. Give each source a clear destination
Open Advanced Audio Properties from the mixer. Our example uses track 1 for the full mix, track 2 for the microphone, track 3 for the game and track 4 for Discord. Match the checkboxes to the table. These numbers are a suggested layout; the OBS multitrack recording guide explains source assignments.
| Source | Enable tracks |
|---|---|
| Microphone | 1 and 2 |
| Game | 1 and 3 |
| Discord | 1 and 4 |
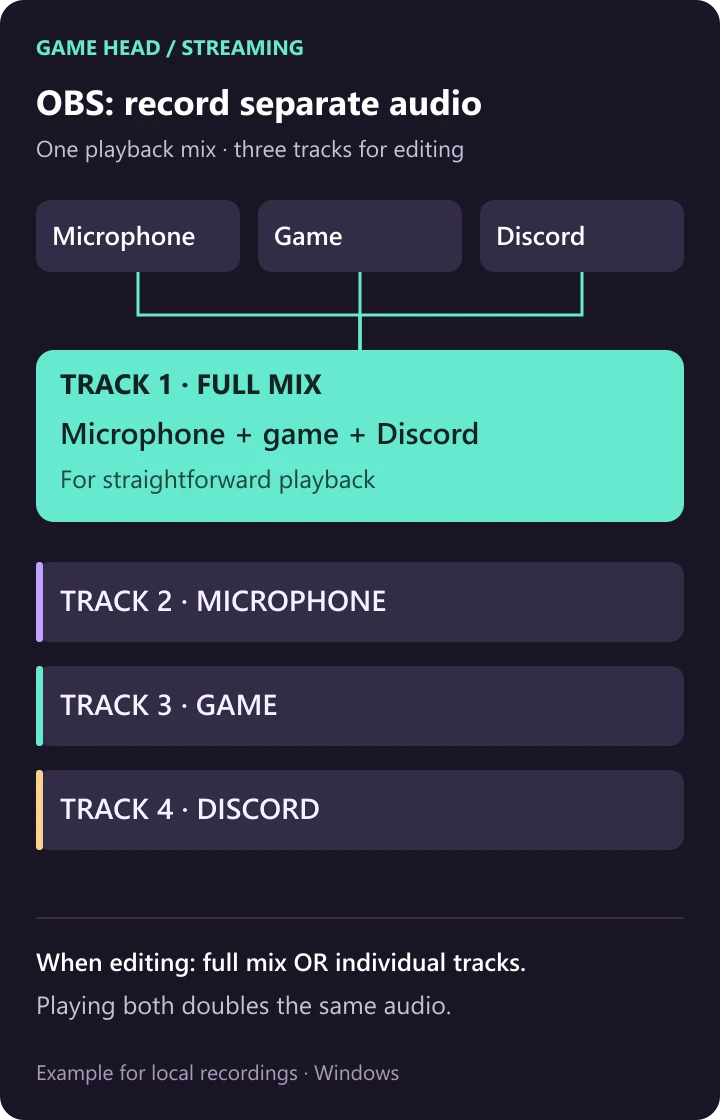
When editing, use either track 1 or the individual tracks 2–4. Playing the full mix alongside those individual tracks doubles the same signals. Mute the mixed track before working with the isolated sources.
3. Enable the tracks in recording output
Go to Settings → Output, select Advanced output mode and open Recording. Enable audio tracks 1, 2, 3 and 4 there. Mixer assignments alone are not enough: the recording output also needs the tracks you want to save.
MKV is a useful starting format. OBS recommends it because an unexpected recording interruption need not make the entire file unusable. If your editor needs MP4, use File → Remux Recordings afterwards. The OBS recording guide covers both options. Check the imported audio tracks in your editor afterwards.
4. Check a short recording before the long session
Record a short sequence with identifiable sections: speak into the microphone on its own, make some game sound, then have another person speak in Discord. Say what each section is for so you can find it again during playback. Include a section with all three sources sounding together.
Import the file into your editor. Listen to tracks 2, 3 and 4 individually: each should contain only its intended source. Then listen to track 1 on its own. If audio seems missing in an ordinary video player, select the mixed track there; many players play only one audio track at a time.
Balance the levels using the saved recording. Your voice should remain understandable over a loud game moment. The OBS audio mixer guide explains meters and faders. A moving meter alone does not tell you whether the mix sounds comfortable.
If the sources are still mixed or missing
Discord is still in the game track: check whether Desktop Audio remains enabled. If Discord runs in a browser, capturing that browser application can also include its other audio. The desktop app gives you a clearer application to select.
An application stays silent: check the selected window, Windows volume mixer and mute controls. Some applications are incompatible with application audio capture. OBS documents alternative routing through virtual audio cables; first narrow down the missing source before adding routing software.
You also stream with a separate Twitch VOD track: adapt this plan first. OBS normally uses track 2 for the VOD mix; our local-recording example puts only the microphone there. Plan the live mix, VOD mix and isolated tracks together using the OBS Twitch VOD track guide.