

Build a Warrior around reliable counterattacks and enough survivability to keep fighting. Warbringer leans toward Counter damage and attack; Martial Sage puts more emphasis on protection. Start with the problem in your current fight, then choose your skills and Pals around it.

Want to compare other classes? Browse the Legend of Mushroom guides. The setup below focuses on a practical Warrior starting point rather than one fixed endgame loadout.
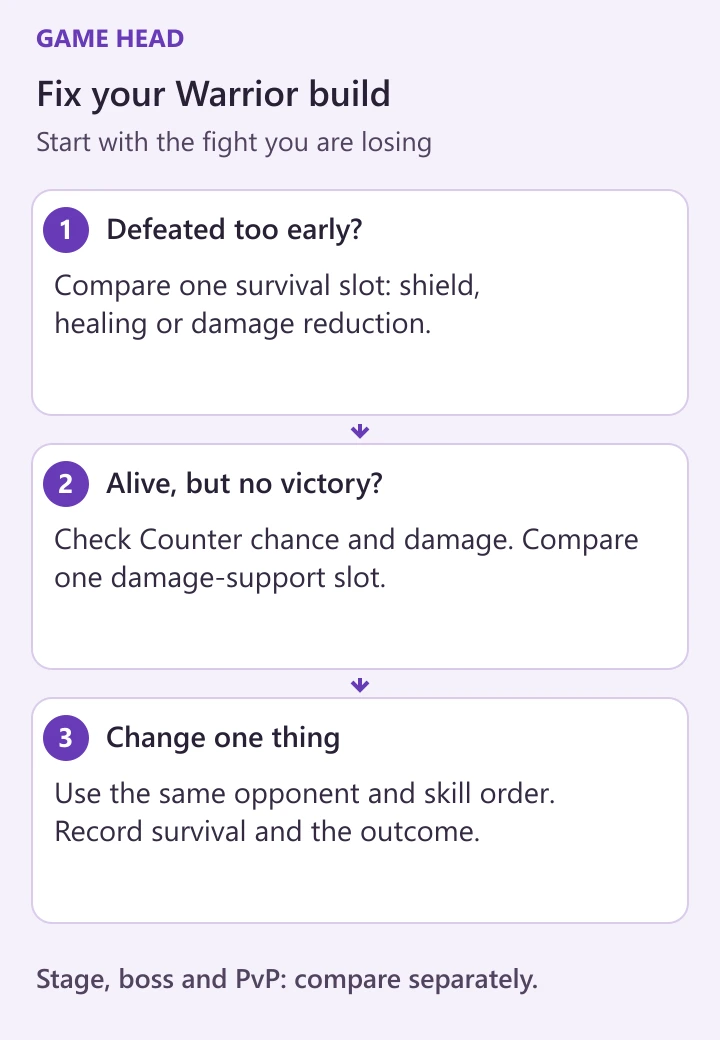
Build priorities at a glance
| What happens? | Next change to compare |
|---|---|
| You lose in the opening seconds | Swap one damage slot for a shield, healing or damage reduction. |
| You survive but cannot finish | Check Counter chance and damage support; compare one offensive slot. |
| PvP works, bosses do not | Make a separate setup for the boss instead of copying the PvP result. |
The Martial Sage Build (Guide)
Martial Sage is the more defensive route in this comparison. Its class panel highlights DEF, Counter, damage resistance and shields. That gives you a useful direction for a protective setup, but it does not make you immune to damage.

Key Stats for the Martial Sage:
- Survivability: HP, DEF, healing and resistance address different parts of incoming damage. Pick the missing layer instead of assuming DEF alone solves everything.
- Counter: Check whether this is the damage route you are actually building. A defensive label does not replace a plan for finishing the opponent.
- Shields: Look at when protection starts and whether it lasts through the dangerous part of the fight.
- Matchup: Compare the same enemy before choosing between more protection and another damage slot.
Still working toward the next class? Our leveling and Magic Lamp guide explains the progression side.
Skills for the Martial Sage
| Icon | Option and role |
|---|---|
 | Blade Pierce Damage over time. Compare it with a survival skill if your Warrior falls too early. |
 | Nature’s Renewal Healing for longer fights. Check whether you live long enough for the healing to matter. |
 | Heroic Descent A summoned attacker for a damage slot. Compare its contribution against your other available summons. |
 | Smoke Bomb A damage-amplifying effect. Consider it when you survive the fight but fail to finish the target. |
 | Clone Strike A summoned attacker. An option for the damage side of your setup. |
Pals for the Martial Sage
| Icon | Option and role |
|---|---|
 | Kongfu Master A recovery option. Compare it with damage reduction when choosing a survival slot. |
 | Angel Deer Damage reduction for a defensive slot. Use it to address incoming damage. |
 | Cat Prince An extra damage effect linked to active skills. Compare it with a direct Counter support option. |
 | Wealthy Lizard Supports Pal damage. This is a different bonus from increasing your own Counter damage. |
 | Electric Pup Counter damage and recovery support. Compare it with other Counter-focused Pals you already own. |
Relics for the Martial Sage
| Icon | Option and role |
|---|---|
 | Ironclad Mask Supports Counter chance. Consider it when the setup needs more reliable counterattacks. |
 | Beasthide Book A boss-focused option. Choose it for the encounter you are actually trying to clear. |
 | Storm Necklace Supports summoned attackers such as Heroic Descent and Clone Strike. Match it to the skills you equip. |
 | Dragonweave Circlet A Pal-dependent effect. Check that its named Pal families are in your equipped team. |
 | Time Statue Extends particular skill effects. Read its named effects before pairing it with your skills. |
 | Metamorphic Crystal A Pal-family bonus. Match the listed families to your team rather than using it for rarity alone. |
The Warbringer Build (Guide)
Warbringer suits a Counter-focused starting build: your equipment and support slots should help counterattacks connect while keeping you alive. The player-written early-game Warrior guide also prioritizes Counterstrike and Crit on gear, with Counterstrike first.

Key Stats for the Warbringer
- Counter chance: The chance to counter and the damage of a counterattack are different stats. Check both before investing only in damage.
- Damage: Attack and Counter damage need a setup that can actually stay in combat.
- Survival: Keep a defensive option when you lose before your damage can contribute.
- Mode: Keep separate notes for a stage, a boss and PvP. Success in one does not establish the best setup for another.
Do not deliberately leave yourself at low HP just to chase damage. A Counter build still needs to survive incoming attacks. If the opponent defeats you before the setup gets going, fix that first.
Skills for the Warbringer
| Icon | Option and role |
|---|---|
 | Blitz Assault A defensive option for a dangerous damage window; compare it with your shield or healing slot. |
| Nature’s Renewal Healing for longer fights. Check whether you live long enough for the healing to matter. |
 | Shroom Shield A shield option. Useful to compare when you need to survive the opening damage. |
| Heroic Descent A summoned attacker for a damage slot. Compare its contribution against your other available summons. |
| Clone Strike A summoned attacker. An option for the damage side of your setup. |
Pals for the Warbringer
| Icon | Option and role |
|---|---|
| Angel Deer Damage reduction for a defensive slot. Use it to address incoming damage. |
| Wealthy Lizard Supports Pal damage. This is a different bonus from increasing your own Counter damage. |
 | Hipster Tortoise A shield option for a defensive Pal slot. Compare it with Angel Deer against the same opponent. |
| Electric Pup Counter damage and recovery support. Compare it with other Counter-focused Pals you already own. |
| Kongfu Master A recovery option. Compare it with damage reduction when choosing a survival slot. |
Relics for the Warbringer
| Icon | Option and role |
|---|---|
| Ironclad Mask Supports Counter chance. Consider it when the setup needs more reliable counterattacks. |
| Beasthide Book A boss-focused option. Choose it for the encounter you are actually trying to clear. |
| Dragonweave Circlet A Pal-dependent effect. Check that its named Pal families are in your equipped team. |
| Storm Necklace Supports summoned attackers such as Heroic Descent and Clone Strike. Match it to the skills you equip. |
 | Energy Statue A skill-specific bonus. Check its named skills against your equipped set. |
| Metamorphic Crystal A Pal-family bonus. Match the listed families to your team rather than using it for rarity alone. |
Conclusion Martial Sage vs. Warbringer
Choose the route that addresses your current obstacle. A protective Martial Sage setup and an offensive Warbringer setup should not be judged by one combat-power number.
For an early Counter build, separate damage slots from survival slots. The early-game PvP guide uses that same distinction: a shield or heal can be swapped back in when a damage-heavy setup fails to survive.
Compare changes against the same opponent with the same skill order. Keep a short note of whether you died early, ran out of time, or won. One lucky result is a weak reason to replace several pieces at once.
Keep building your character with the Archer guide, Mage guide and awakening guide.
When to revisit the starting build
After awakening, later systems can change how a class works. Class Ascension, for example, introduces additional passives and fusion choices. Keep that progression separate from choosing your first Counter-focused equipment.


queria uma build pra ficar mas tempo na fase do peixe cabeçudo pra tankar mais e uma build PVP
Pingback: Legend of Mushroom Awakening: Seals, Crystals and Scrolls